When designing your own bags, calculating the volume it can carry when filled can be a bit of a tricky task. We do not have access to the industry standard method, which is filling it full of small balls of a known size and using this to calculate the volume. Although an industry standard, it does not mean all manufacturers use this method!
For this article we are going to simplify this problem by assuming a 3D rectangle - a cuboid or rectangular prism. More complicated shapes will take further consideration.
TL/DR: Its complicated, and don’t stress it too much. It is difficult to compare to commercial products
Pattern Pieces to Finished Bag Volume and Dimensions
The first step most people take is using the fabric panel dimensions, and doing the simple calculation:
width * height * depth
This is great for calculating the volume of a rigid object, but bags are soft and therefore deform. This curvature greatly changes the actual volume a bag can contain.
The idea that a bag has a different volume when filled compared to the fabric dimensions may seem a bit of an odd concept, because the surface area (amount of fabric) does not change, and the fabric essentially does not stretch.
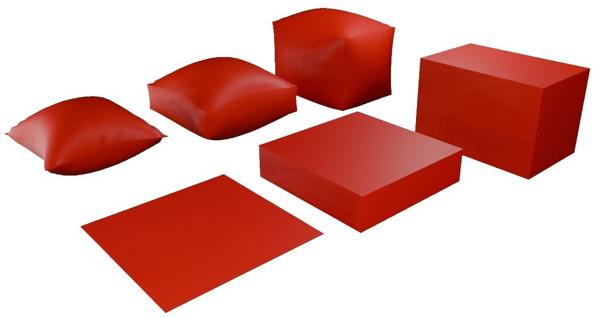
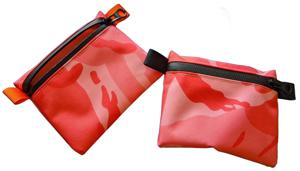
However, take the example on the left on this image, the flat square (e.g a teabag or sandwich bag). Doing the fundamental width * height * depth calculation, e.g. 10cm * 10cm * 0cm would result in it having zero volume as it has no depth (just two identical flat pieces of fabric sewn together). However, when it is filled, it clearly bulges out and has volume. For a constant surface area (no material stretching), a sphere is the shape with the maximum volume, so your bag trends towards this. The seams do not allow it to form a true sphere, so you end up with the familiar pillow case shape.
With the tea bag example, the relative volume change from flat to inflated is dramatically large. With a cuboid shape, the relative change is still significant but not as dramatic.
So how can you estimate the filled volume based on the dimensions of your pattern pieces?
After running many fabric volume inflation simulations in Blender for a variety of common bag shapes (flat pouches, backpacks, bike frame bags), I’ve come to some very generalised rules. An older version of this article had 3 different rules for different shaped bags, but I've since calculated an equation based on the fabric dimensions assuming a typical cuboid shape.
Simulation-Based Cuboid Bag Calculator
This calculator uses a fitted equation from my cloth simulations. Enter the three panel width, depth, and height dimensions below and it will estimate the filled volume and the final puffed-out bounding box dimensions. The input order does not matter.
Original Panels: 0.0 x 0.0 x 0.0 cm
Rigid H*W*D Volume: 0.00 Litres (0.00 cm3)
Stuffed Volume: 0.00 Litres (0.00 cm3)
Stuffed Footprint (Bounding Box): 0.00 cm x 0.00 cm x 0.00 cm
Real World Considerations
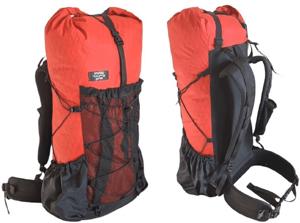
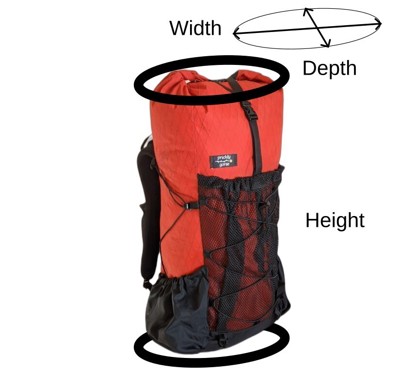
As a real world example, I have a commercially made backpack quoted at 25L, which is a very convenient rectangular cuboid shape. Measuring the fabric panels width x height x length gives a volume of 19L, quite a difference to the quoted value. A 3D software fabric simulation with a low internal pressure gives 24L.
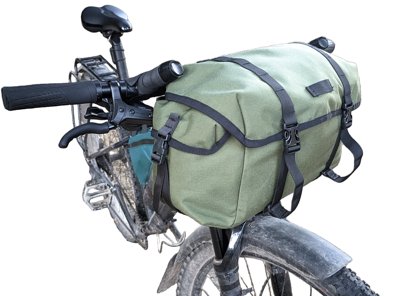
Regarding the stuffed dimensions, flatter bags increase in outer dimensions dramatically, with a flat sandwich bag being the most dramatic example. A less extreme example but relevant to MYOG is a bike triangle frame bag. It is a flat shape relative to the length and height, usually about 5 to 6cm wide. My 5cm wide bag as patterned is currently bulged out to 11cm, which matches the calculator estimate above. The actual filled volume is 30% higher than if I had calculated a flat triangle. There is restricted room between your legs on a bike for a frame bag to fit without rubbing the legs, which highlights the importance of considering the amount of bag bulge when patterning.
If you are familiar with the 3D modelling software Blender, simulating volume is easy by adding a “Simple” subdivision surface multiplier then cloth physics, which is how I generated the above simulations.
Calculating Volume from a Made and Filled Bag
For the inverse problem, trying to calculate the volume of a made bag (cuboid shaped e.g. a backpack), again it is best to avoid doing a simple width * height * depth calculation of your actual fabric pieces as this does not account for bulging.
Instead, you can use the equation for calculating the volume of a elliptic cylinder using the actual puffed out bag dimensions, not the fabric panels width and height themselves.
Filled Bag Volume Estimation
Volume: 0 Litres